Sunday, November 11, 2012

Time to play nook-y!

Okay, upon further reflection, that title might be a little risque.  Does anyone use the word hooky anymore? Anyway, I have found that blogging during the school year is nigh impossible.  Between planning, grading, coaching, and being in charge of drama, I can barely squeeze in time with my husband, let alone diying and crafting.  I lose the itch.  But it resurfaces every spring without fail; HGTV will be on many more hours than my husband can stand, and various tools and implements will appear all over the house (also to his dismay).  I do, however, have a few projects that leaked over from the summer or are quick things I could do in a weekend.  Consider these next few posts the purge of projects (yay! alliteration!), and then they will be spotty at best until spring/summer.  So here we go...

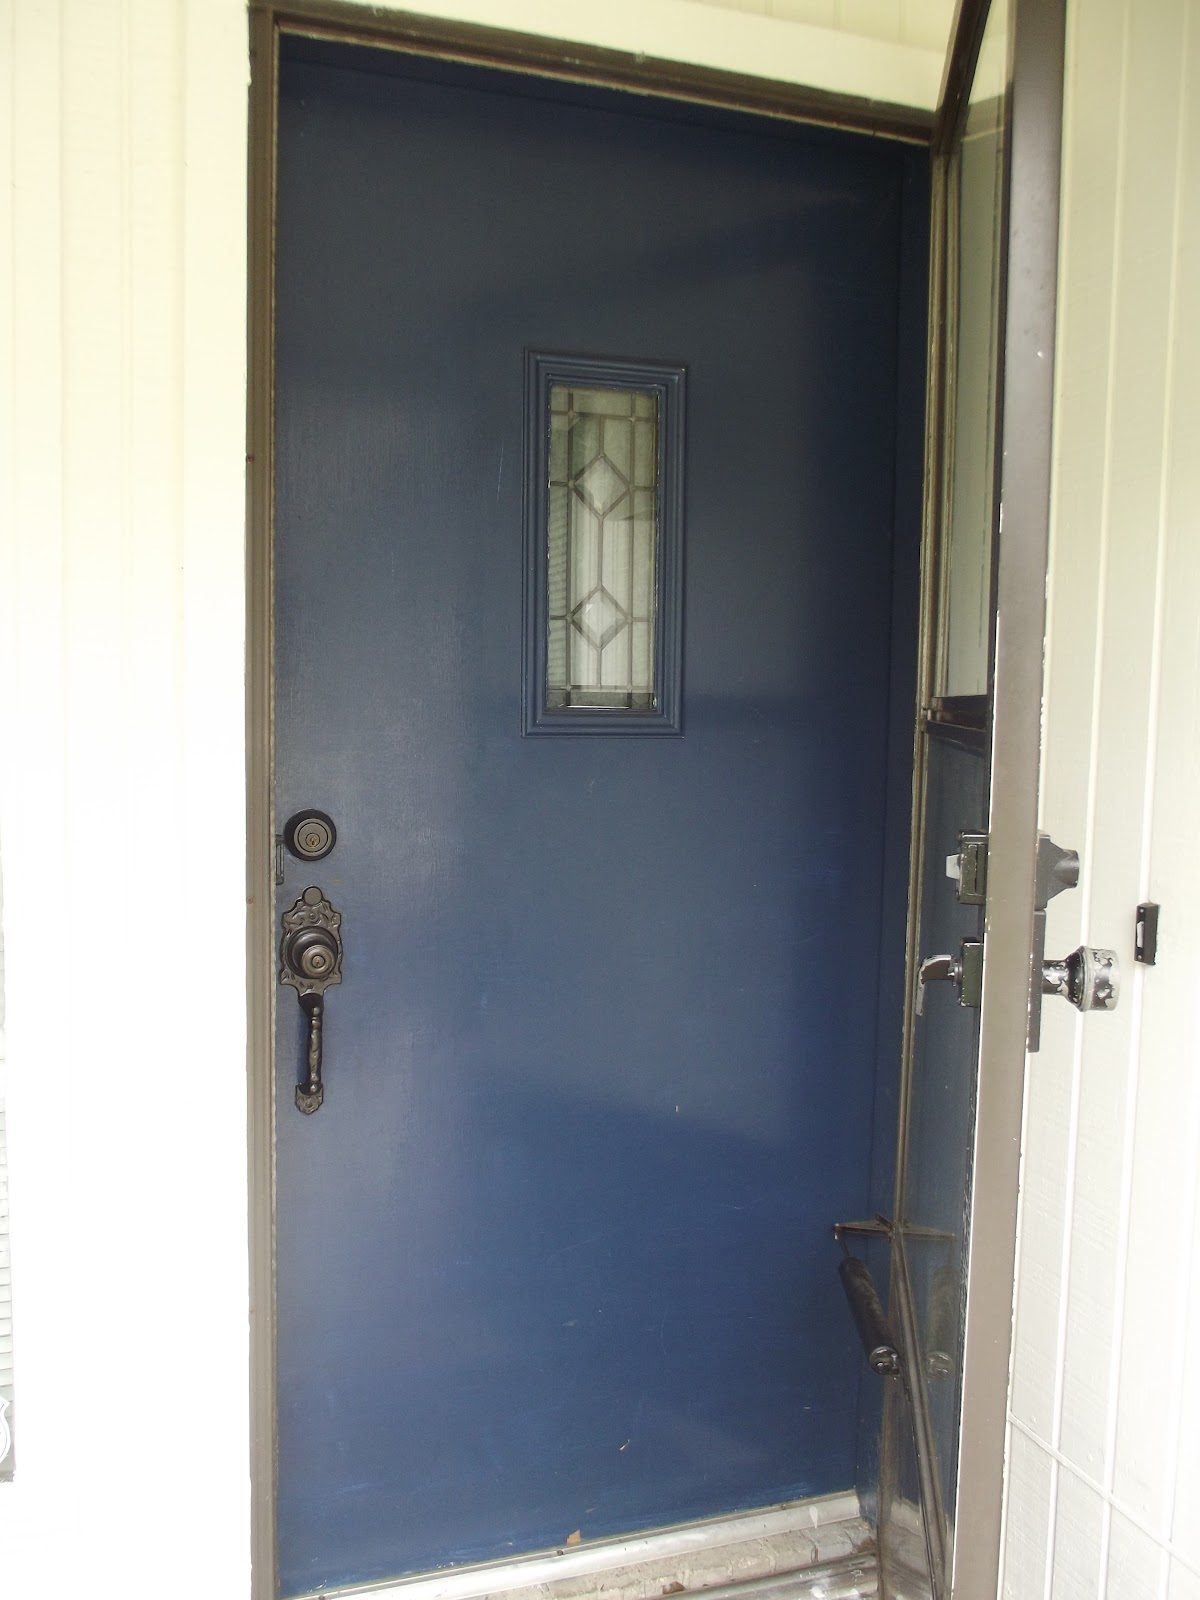
Delighted with a bright, new-to-me door seen here, I decided that my inside entryway needed some help also. I have this weird little nook right inside the door which previously included a piece of furniture with a drawer that barely fit into the space and held nothing particularly useful, a key bowl that we would never put our keys into because it lived directly next to a window (duh, very smart), and a pile of umbrellas and reusable shopping bags.  Lovely.  Who wants to open their door to clutter?  Not me, sirrah!

Step one: clear out the space.  Not recorded for posterity.  Sorry 'bout that.  Step two: figure out something to give the space some personality.  Enter stage left: a stencil!  I love stencils; especially all the fancy and modern ones that are coming out lately.  To me, stenciling is the new and improved wallpaper (even though wallpaper is also having its updated moment as of late).  The application is less messy albeit can be more time-consuming, the prep work is negligible (the same as painting a wall), and it is very affordable.  I went to my fave stencil site, Cutting Edge stencils for some inspiration and/or to buy a stencil.  I have bought from them before and they have a lovely product.  Perusing their site, I knew I was looking for something fairly simple and graphic since it was such a small area.  I saw the Harlequin Trellis stencil and fell in love.
From cuttingedgestencils.com

Simple and graphic, and I also really liked the pearlescent quality of the blue paint.  Forty dollars is also pretty reasonable overall for a stencil that you can use forever.  But...the design was so simple, I wanted to try to make it myself.  Using vinyl and my Silhouette cutter, that's what I did.  

First I used the Silhouette program to make about a quarter-inch wide lines that I would use as a kind of reverse stencil.  I also cut out a diamond shape that closely matched the measurements of the one used for the stencil to use as a guide when placing the lines.


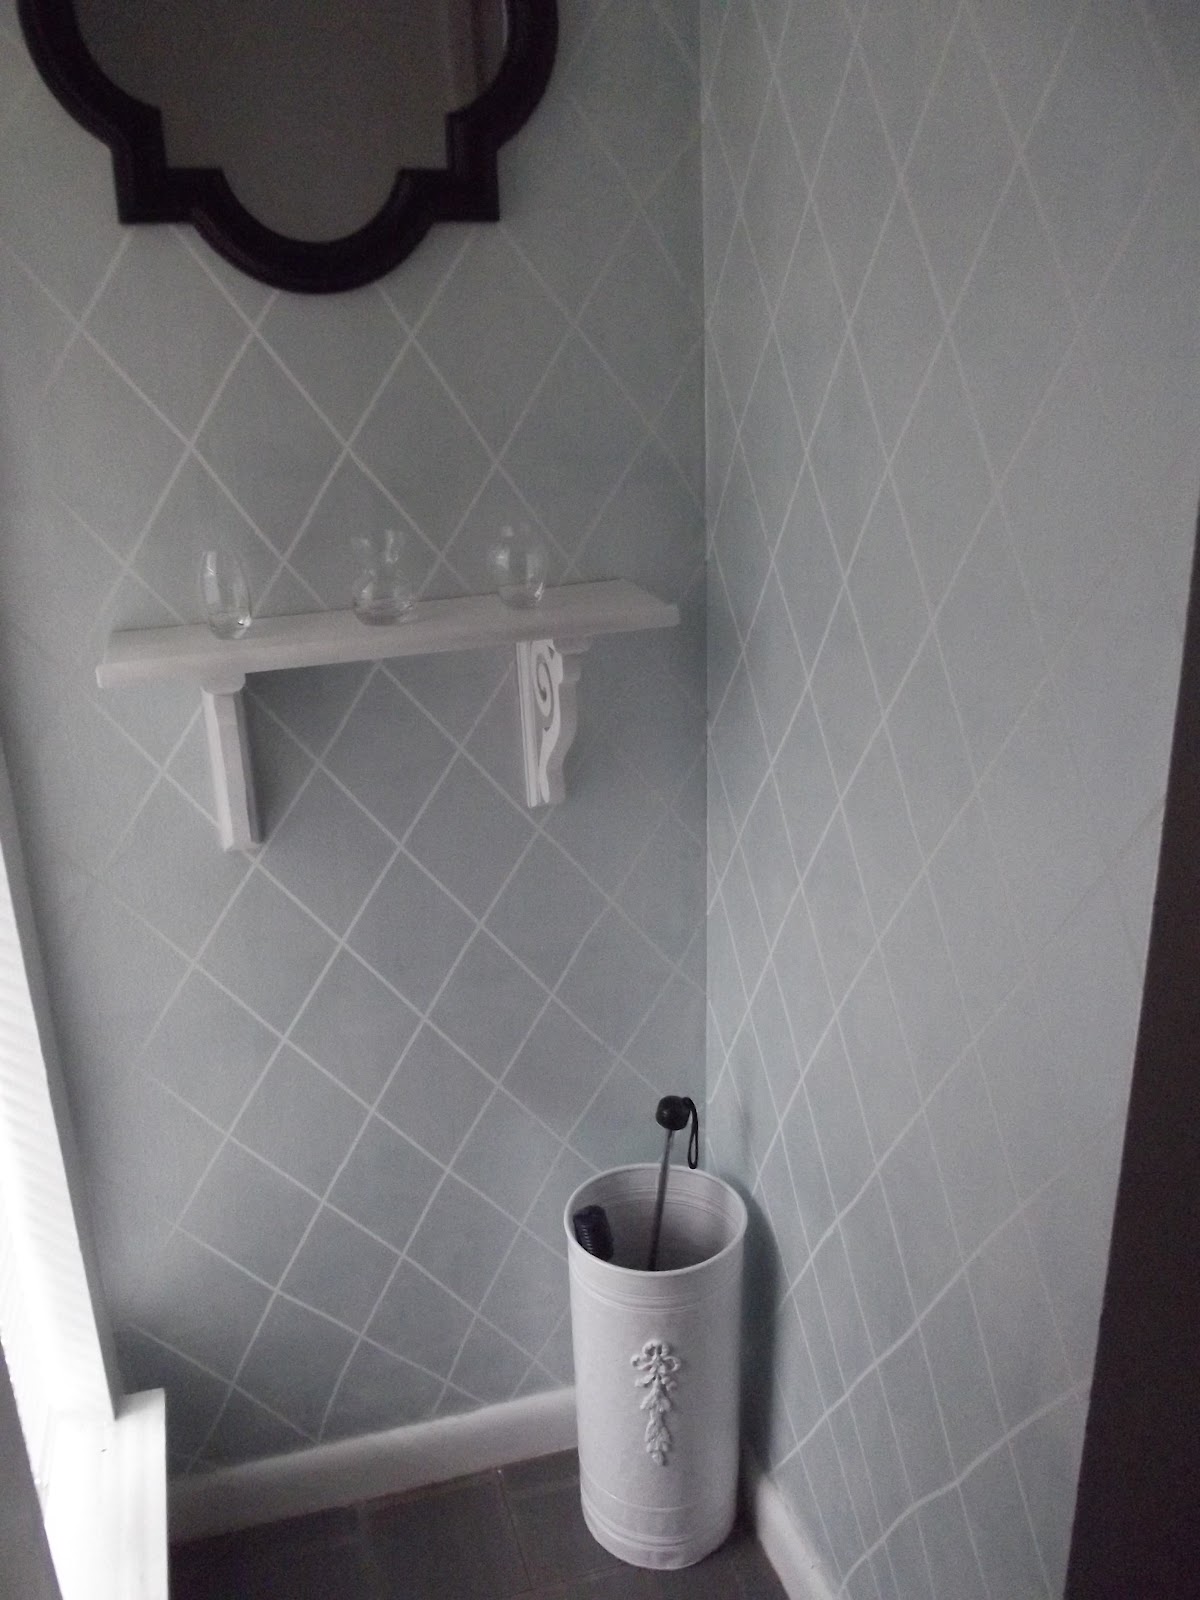
In essence, it worked.  But man, was it tedious.  It took about five sheets of just lines to fill the entire area, and as you can see in the picture above, some of the diamonds got a little...wonkified.  To say the least.  I made sure the ones at eye level were dead on and decided that I was not a perfectionist and in the scheme of things, it didn't really matter.  Which I believe...wholeheartedly...yeah.  For forty dollars I could have gotten perfect lines every time.  I used Martha Stewart pearl paint in Jetstream; took a lot of coats.  A lot.  


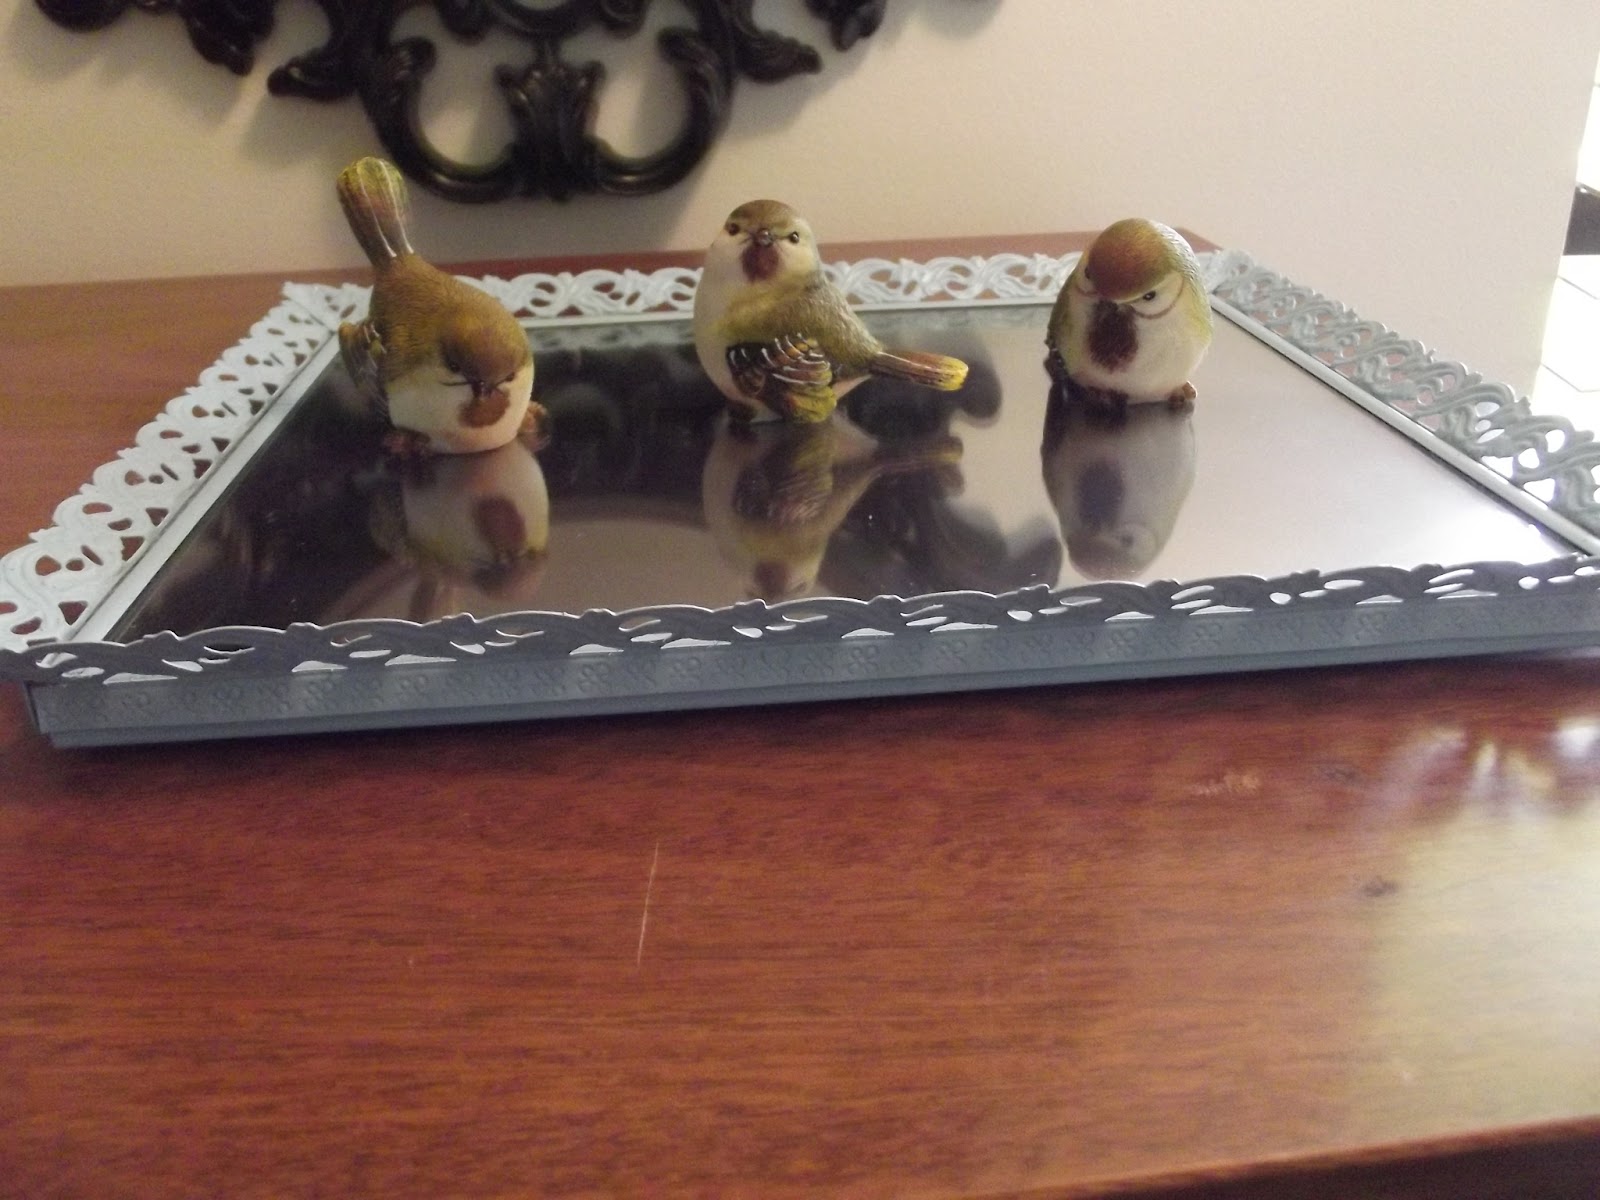
It looks very light, but when contrasted against the white lines, it is not as subtle.  It certainly doesn't hit you over the head, either.  Who wants to be hit over the head when they walk in the door?   Unless you have a bug on your head, of course...but I digress.  I wanted a mirror to check lipstick and hair (and facial hair for my husband?  I really have no idea what men would need to check) on the way out. I decided I needed a little white shelf, and I love how designers on HGTV use corbels all the time to fancify something.  One trip to Home Depot later, and I was the proud owner of a pre-cut piece of pine, some corbels, and a little bit of trim.


Painted those suckers white and used Liquid Nails to adhere them all together.  Laziness, thy name is Allison.  A cool mirror from Target and little tealight chandelier from West Elm and here we are.


The picture below is actually the closest to the color, mostly blue with a hint of greeniness to it.  

It's a good place to keep all of our umbrellas, and it is a more calming space to enter after a crazy day with students and whatever else.  It's still a bit bare, so I'm working on a little something to be revealed later.  Oh, the suspense!  What do you think?  Why not make a pretty little area out of a weird nook?  Go get your nook on!  


Tuesday, July 3, 2012

A little indoor gardening

I've been obsessed with watching Jamie Oliver's show "Meals in Minutes" on BBC America this summer.  It's like Rachael Ray with a cool, laid-back Brit that is a professional chef and home gardener.  With Wimbledon on for two weeks and thoughts of the Olympics in my head, I have become a bit of an Anglophile.
from Foodista.com

Anyway, Jamie Oliver always uses fresh herbs in his cooking and he just meanders over to a container and rips some off.  He's even got some in antique coffee cans; too cute.  So I wanted to find a place in my house to pot some herbs.  Unfortunately, I don't have a cute kitchen window that would be an ideal place.  My kitchen is an island of sadness in the back of the house.  Sigh.

Refusing to be put off, I resolved to find some window somewhere that the cats (3 of them!) couldn't access.  Yeah, that doesn't exist.  We have ninja cats that can get anywhere and will chew anything green.  Grrr...


Don't be fooled by the innocent looking feline.  It's a ruse.


What is that apparatus hanging in the window, you ask?


Why, it's a hanging herb garden!  I used a large unfinished CD crate from JoAnn's that I had lying around and painted it white.  I took a few hooks and screwed them into each corner of the crate, used about 3 jump rings on each corner to connect the hooks to the length of chain I had cut from Home Depot that is threaded through the eye closures screwed into the window opening frame.  


I've got basil and thyme growing in these and some rosemary and parsley outside.  Those are the herbs I use the most in my cooking.  The pots and containers do have holes in them for drainage so I have a plastic bag lining the bottom of them so water doesn't drip onto the windowsill.  


I've also taken to keeping some cut green onions in some water.  I've used a batch at least two additional times before the bottom starts to look a little...hinky.   It's an easy way to keep a small amount of green onion around for garnish or a quick topping.


Those are my indoor gardening adventures!  I'd like to get a bay tree for the glass room, but we'll see how that goes.  They are surprisingly difficult to find around here.  A Meyer lemon tree would be fun, too.  Any gardening adventures of your own?

Wednesday, June 13, 2012

Laundry matters

I'm in the process of trying to civilize my laundry area.  It's an awful place to do laundry.  Honestly, I have decided that laundry is dreary enough without having to face clutter and dirt.  The irony of doing laundry in the dirtiest corner of the garage is also not lost on me, but I don't appreciate it.  I've got some reorganization ideas that are in the works (to be continued), but I have a crafty thing to share.  I was inspired by these kitchen container labels...
via Pinterest

I wanted something pretty to put laundry detergent in, and I found this container at Target.


I used my Silhouette cutter to create a label out of vinyl.  I had to use tweezers to get all the insides out of the a's and e's and such.


For ease, I used vinyl transfer paper to ensure that my words were all aligned and so I didn't have to try to place them one by one. This step alleviates the tedium of vinyl transfer.


Got everything applied and here is the final product!  I picked my favorite two definitions from the dictionary, or rather the literal, technical one and another that was more... philosophical.  The two things you really want from doing laundry, right? 


I found a set of cheap scoops on Amazon to keep in the detergent.  I used DejaVu Serif Condensed for the word "clean", Deja Vu Sans Condensed for "[kleen]", Cordia New for "adj", and Courier New for the definitions.  


Hope you like it, and I am excited to put it in a new and improved laundry area soon!  

Tuesday, June 12, 2012

Music to my eyes! No, I don't have synesthesia.

So I was watching good ole' HGTV and this show called "Junk Gypsies" and got inspired.  They had found an old broken french horn, drilled a hole and made it into a pendant light!  I thought something straight would make a great lamp and began the process of searching for broken clarinets and flutes on Ebay.  I explained my plan to my musician husband, and he said one of the most shocking things in our marriage to date, that I could use one of his old clarinets and turn it into a lamp.  Doesn't seem shocking? We have a regular cornucopia of instruments in our house, several of which do not work, but he has an attachment to every single one, so when he said I could have one, I considered it quite a coup.  My feminine DIY charms must finally be working.

First thing I needed was a lamp base since the clarinet would just topple over without one.  I considered making one which would involve lots of drilling and sawing and circles (shiver), but quickly vetoed that idea and decided to find a lamp I could cannibalize instead.  Lampibalize?  Anyway, I found a lamp similar to this one at Target that was about the right height for the clarinet.
From Target.com

I disassembled it, basically unscrewing every piece until I had this.

I glued the clarinet pieces together using E-6000 glue and waiting patiently for it to dry.  Or didn't and had to reglue it when it came apart.  Oops.  Be patient with your glue, kids.  Moving on...When it actually was dry, I threaded the cord up through the bottom of the clarinet and through the threaded rod.  Realizing the rod would show through the clarinet holes, I spray painted it a flat black.  

Here is the clarinet with the rod and cord threaded through still waiting to be sprayed.

I glued the clarinet to the lamp base to ensure it wouldn't be wobbly.  The curve of the base actually perfectly fit the curve of the clarinet bell; kismet, I tell ya. 

 I pulled the excess cord through the bottom after reattaching the white and black wires per the label on the lamp.  The wires weren't actually different colors, but there should always be a ribbed one and a smooth one.  Every time I rewire a lamp, I have to look up which cord is neutral (white, ribbed in my experience thus far) and live (black, smooth).  Before you start fiddling with electricity, I highly recommend doing your own research relevant to your fixture.    

Replace the shade, give it a bulb, and voila!

It's a pretty tall lamp, but the whimsy of it is perfect for my musician's home.  And it's extra fun because I made it myself!  

I think my husband better start hiding his instruments before I get any more ideas.  


Monday, June 11, 2012

My door now spells "Welcome!"

 I've been thinking about how my house feels lately, and I've started taking the dark, unpleasant parts of it and trying to figure out how to make them more welcoming.  I decided to start at the most logical place: the front door.  This is what greeted me every day after work...
It's pretty uninspiring and not particularly welcoming.  It also didn't coordinate with any of the paint on our house anymore since we painted it white with Michigan State green trim (Go MSU!).  I don't know why it took me so long to tackle it after we painted the house (um...two years? totally embarassing), but I was having the first party ever at my house and wanted to put my happiest foot forward.  Earlier I had sprayed the antique brass (only "antiqued" cause it was so old and beat up) hardware with oil-rubbed bronze spray paint, and it has held up pretty well so far.  A few nicks and scrapes, but we will probably replace it all soon anyway.  

First step was to prime the door, and I used Zinnser Cover Stain oil-based primer (my favorite) since it doesn't really necessitate too much prep work.  You can even use the stuff straight on laminate without a bubble.  Amazing.  The blue was pretty high gloss, so I wanted to make sure the new stuff would stick.
Not the prettiest sight, but I knew it would give way to greatness.  Or at least something I could get excited about.  Now for the color...I wanted something cheery that said, "Welcome Home!" and wore pig-tails and had an endearing chip in its tooth and smelled like freshly mowed grass or something like that, and this is what I came up with.
I used Behr semi-gloss and custom color matched some other sample I had found.  I love it!  I feel like it is a breath of fresh air, and it actually has a positive side effect of brightening the whole entry to the house.  Even at night, we can actually see the keyhole because we have more light bouncing around.  Yes, it's bold.  Yes, it's a little crazy.  Yes, we have a door that doesn't match the color of the rest of the trim.  And I am enamored.  
It even has presence behind a pretty banged up glass door.  I feel like my door almost needs a name now.  Daisy Mae? I've got mad plans to update the rest of this little part of the house including that ugly lightbox thing, replacing the broken doorbell, and some container plant action.  We'll see how it progresses!


Monday, June 4, 2012

Mirror, mirror on the $10 dresser

I was thrift store shopping in St. Augustine with my mother and mother-in-law a while ago and found this picture frame for fifty cents.  I've been in a tray phase and someone pointed this out to me as having an interesting filigree-like edge. I thought I could easily make this a tray!  

First I applied thin, even coats of mirror spray paint on the opposite side of the glass.  Read the directions on the can for more tips on good coverage. I found a spray paint color in my collection that tied into the material I'm using for the curtains in my craft room (pics will come later, promise), and a couple of even, thin coats later, I had this...


Add a couple happy birds ( a couple of which seem to be intrigued by their reflection in the now-mirror) and you have a fun little dresser-top tray!  This is currently residing on a $10 yard sale dresser that I have yet to complete refinishing.  More to come later!

Total cost: 50 cents for tray
mirror and spray paint (already owned)
fun birds (birthday present)
=$0.50!

If you had to buy the paint, it would probably go up to $10 or so, but then you would have materials for a bunch of other things!  Any fun picture frame/tray transformations? 

Wednesday, May 23, 2012

Love you, man!

I was perusing Pinterest and found this little framed delight...
I love its simplicity and shadow frames are so fun and dimensional.  I put it on my "Art to DIY" board for a later date.  Well, that day has come!  I appreciated the simplicity of the design of the inspiration but wanted a little more pizzazz, if you will.  I also wanted to show off my Silhouette cutter to my mom when she was visiting.  Here is my pile of supplies: a shadow frame with no glass cause it was on the ground at some point and I stepped right into it and broke it (oh yeah.  I'm smooth), some Scrabble tiles from an antique store, and a pack of scrapbooking papers.  

First step was to find two complementary papers, which resulted in an orange dotted paper and a orange-themed floral.  I used my Silhouette to cut a square out of the dotted paper for the background (honestly, it is worth its weight in gold to me just because it does that easily) and a letter collage from the Silhouette store for on top.  Initially, I had some trouble because the design was so intricate and my mat was so sticky, but a little online research and some t-shirt dabbing (to get some fibers on the mat and reduce the tackiness), and it came off perfectly!  I used spray adhesive so I didn't have to worry about any bubbling, excess, or not enough glue and layered the two together.  I positioned my tiles first (to see what placement I liked) and then used E-6000 adhesive to adhere them.  Put all together again and voila!  

I gave it to my husband for a little reminder of how awesome I think he is, and he gave me something for my birthday that completes the look!  Meet Flopsy and Mopsy!

He is buying into my love of white ceramic animals (I'll do a run-down of all of those sometime later).  Aren't they cute together?


Tuesday, May 22, 2012

A little bling

My husband's cousins were visiting St. Augustine a while ago and their three children all happened to have a birthday within that month, so I decided to make a little something for their little girl.  We sent gifts to all of them of course, but this is the blingiest of them.


I had most of these supplies left over from a jewelry-making phase.  I used some chain and attached some pink pearls and charms with some small jump rings.  I used the clasp that I thought would be easiest for her to use, and it will grow a bit with her if she still likes it for awhile.  I just hope it will remind her of Florida and the vacation she spent here.

Cheers to craftiness!

Monday, May 21, 2012

Is it a bib? Is it an apron? It's a bapron!

So a friend of mine had a baby a little while ago, and I was searching for a suitably homemade gift to give the happy parents.  I came across this little gem on Pinterest.
The tutorial is pretty thorough and can be found here. I took a couple of pictures along the way.  I bought the bias tape at Joann, but honestly, after looking at the tutorials on how to make it, I will probably do it myself from now on.  It's mostly just folding something in half and ironing.  I mean, seriously.  Here are the two pieces to baste together.


I used some leftover indoor/outdoor fabric from previous projects thinking it might make cleaning the bapron easier in the future.  Here it is with the bias tape on it.  

I wanted to add something cute and personal to the front, so I used my Silhouette Cameo (love that thing!) and cut a fish with bubbles out of some cute material.  I used Fray Check on the edges and just fabric glued it on.  I then used my Silhouette to cut a stencil out of vinyl and used fabric paint to make the "little fisch" print on the front.  

My friend's surname is Fischetti, so "little fisch" is not just a typo.  Here it is all finished!  I hope they will get good use out of it in the future!  


   I am in love with this thing.  It's just so darn cute!  I keep threatening that I am going to make adult-sized ones for the sloppier eaters in my family.  It's definitely my newest favorite baby present!  


Tuesday, May 15, 2012

To bee or not to bee

Sorry for the Hamlet/insect pun.  I'm an English teacher; I can't really help myself.  

This is my new favorite decorative thing, and my only regret is that I do not have a ton of wall space with which to create and use more of these.  This was my inspiration.  
I searched my favorite local antique store for an old dictionary that had the font size that I wanted to no avail.  But I did spot an old collection of Shakespearean plays which my friend happened to kindly buy for me.  (Thanks Danni!)  As an ex-librarian and self-professed book hoarder (I'm getting better, I swear), this was a tough step for me, but I took my x-acto knife and cut out some pages to feed into my printer.
I found this cool blog that posts a vintage image every weekday and scanned a bunch of images to find the ones I wanted.  I found some others using Google images that seemed to be ( I say "seemed" since copyright law is complicated business) okay to use.  Here is one collection.

If you can't tell from the shadowed picture (sorry about that! figuring out my new camera still), I have a shell on the left, a crab in the middle, and a fish on the right.  

I made another to give my mom for Mother's day (with each picture representing a member of our family), but forgot to get a picture of it before sending it home with her.  This is one of those instant gratification projects that I love. All you need is a book, a knife, a printer, and a dream!

Tuesday, May 8, 2012

Who knew cutting things could be so much fun?

Okay, that title sounds a little macabre.  I only meant that cutting things with my new Silhouette Cameo is so fun!  Even knowing that this thing exists in my house gives me immeasurable pleasure.


I used it first to create these river rocks for my AP students.


Yes, I am giving them rocks as a good luck gesture for the test.  You'd have to hear my spiel about the symbolism, I guess.  I used the Cameo to cut out the vinyl small seal script figure.  It's the ancient Chinese character for literature and it's pretty simple for the silhouette, but would have been a pain for me to attempt with an x-acto knife.


I had the image scanned to a PDF, and I copied the image into the Silhouette software.  I used the trace function to outline the shape (amazing!) and cut away!  I did them in a variety of sizes according to the varying rock sizes, and the smallest one is pretty darn tiny!  I wrote the course, year, and signed the back of each so they can keep them as a memento of the class if they want.  I still have the mini-beanie baby my AP Calculus teacher gave us before the test.  That's also the test I got a 5 on; coincidence? Anyway, I'm very happy with the way they turned out and hope my students will look at them and feel serene and confident during the test.


Every make any memento for an occasion?  Have a silhouette cameo story/project to share?