Wednesday, April 25, 2012

O True Apothecary!


As an English teacher, I cannot ever resist a good Shakespeare quote opportunity.  Romeo's death scene? Ring a bell from many moons ago? "Thy drugs are quick.  Thus with a kiss I die."  Gets me a little choked up even now.  Anyway!  Apothecary jars have really been everywhere lately it seems and you can apparently put anything in them.
Eggs and candy 

Miniature gourds

Woods-themed objects
Office supplies

Some ornaments and pine cones for a winter theme!
All via Pinterest

I couldn't resist getting in on the action.  It start when I found this guy at a flea market for $5. I just filled him with dollar-store decorative marbles and put him on our mantel next to Girard (our French white ceramic panther).


That was not enough to satisfy.  I had read somewhere about using E-6000 glue (heavy duty) to affix glass candlesticks to containers to create your own apothecary jars.  I found a covered glass container at the dollar store, some candlesticks at Goodwill, a little time on my hands (often hard to come by) and voila!


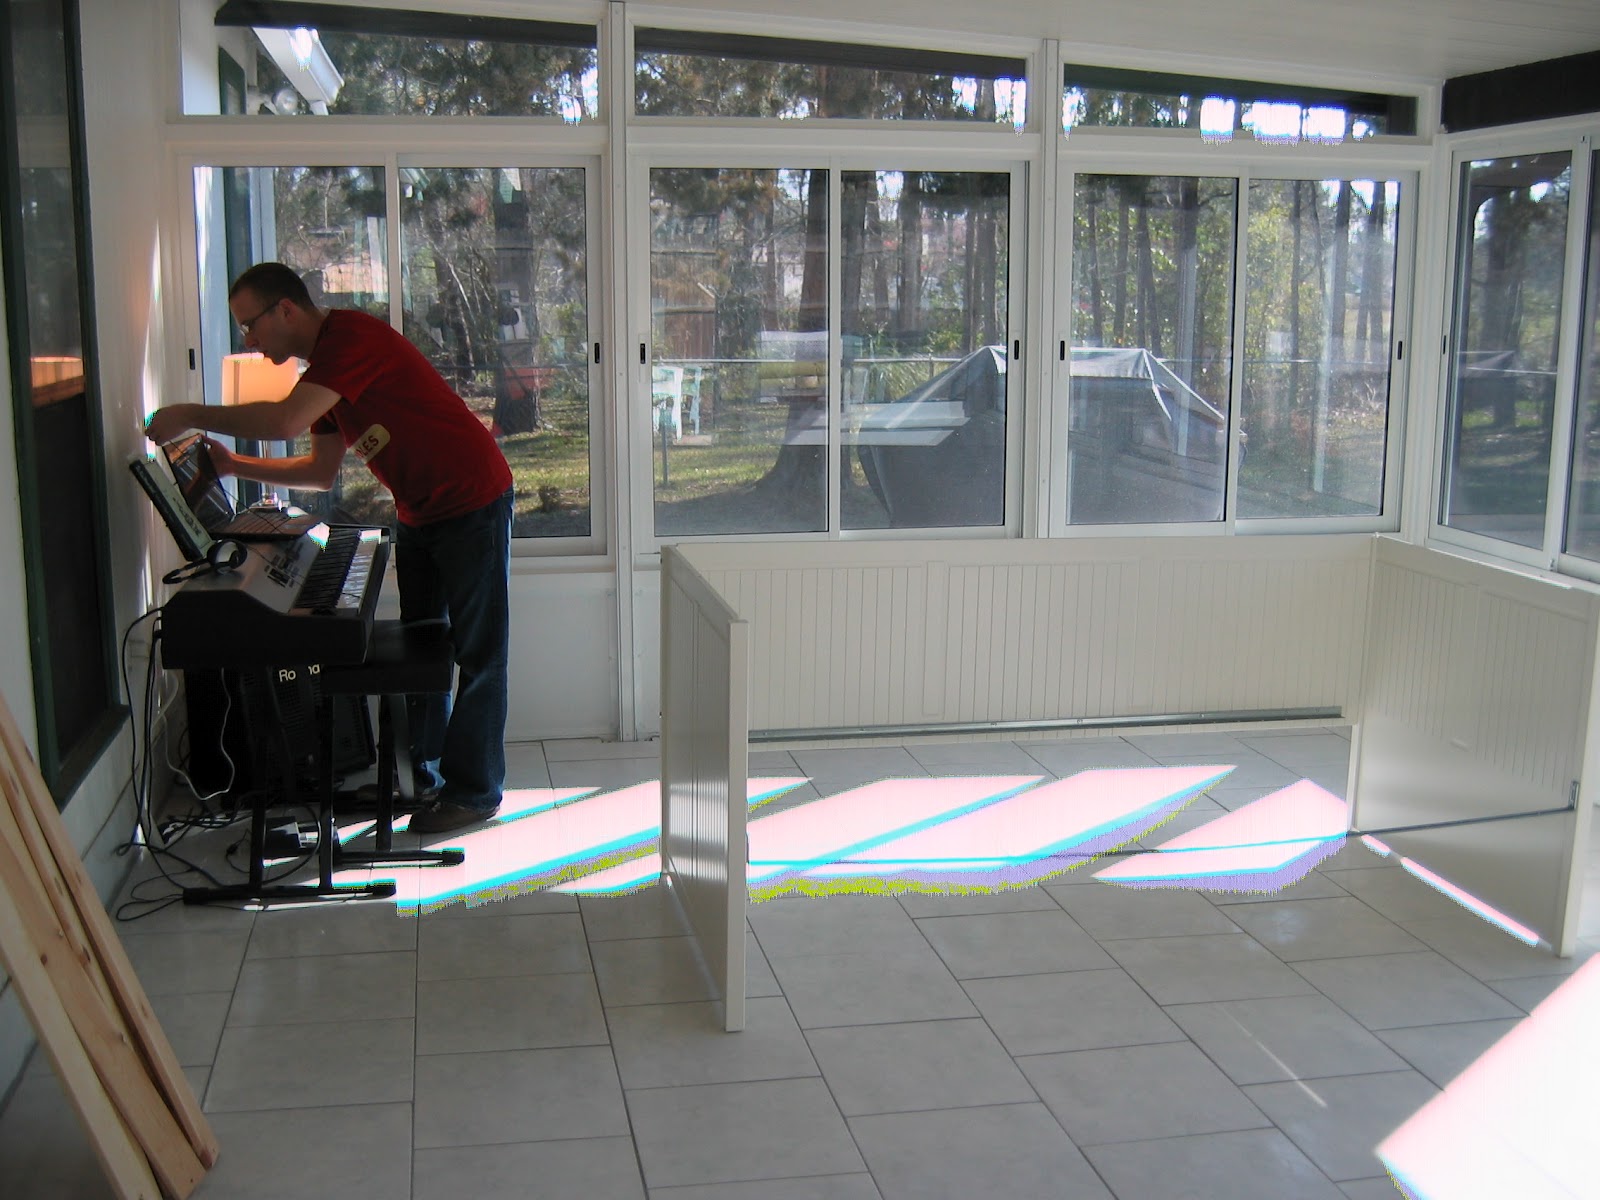
It's out in the glassroom on the shelf over the keyboard.  I am going for gray and white with yellow accents and pops of teal out there as a color scheme.  For my filler, I just took some dried beans (that I never end up cooking, what can I say? I'm a canned bean kind of girl) and spray painted them a happy yellow color!  It adds a little pop of color in that corner.

I then found another cute little container at Goodwill (it's hit or miss, but I love stopping in just in case there is something awesome that day) and another candlestick. You may wonder what I have against candlesticks in their original form, but I'm just not into tapered candles for some reason.  Pillars are what tickles my romantic light fancy.  A little glue later, and I have this...

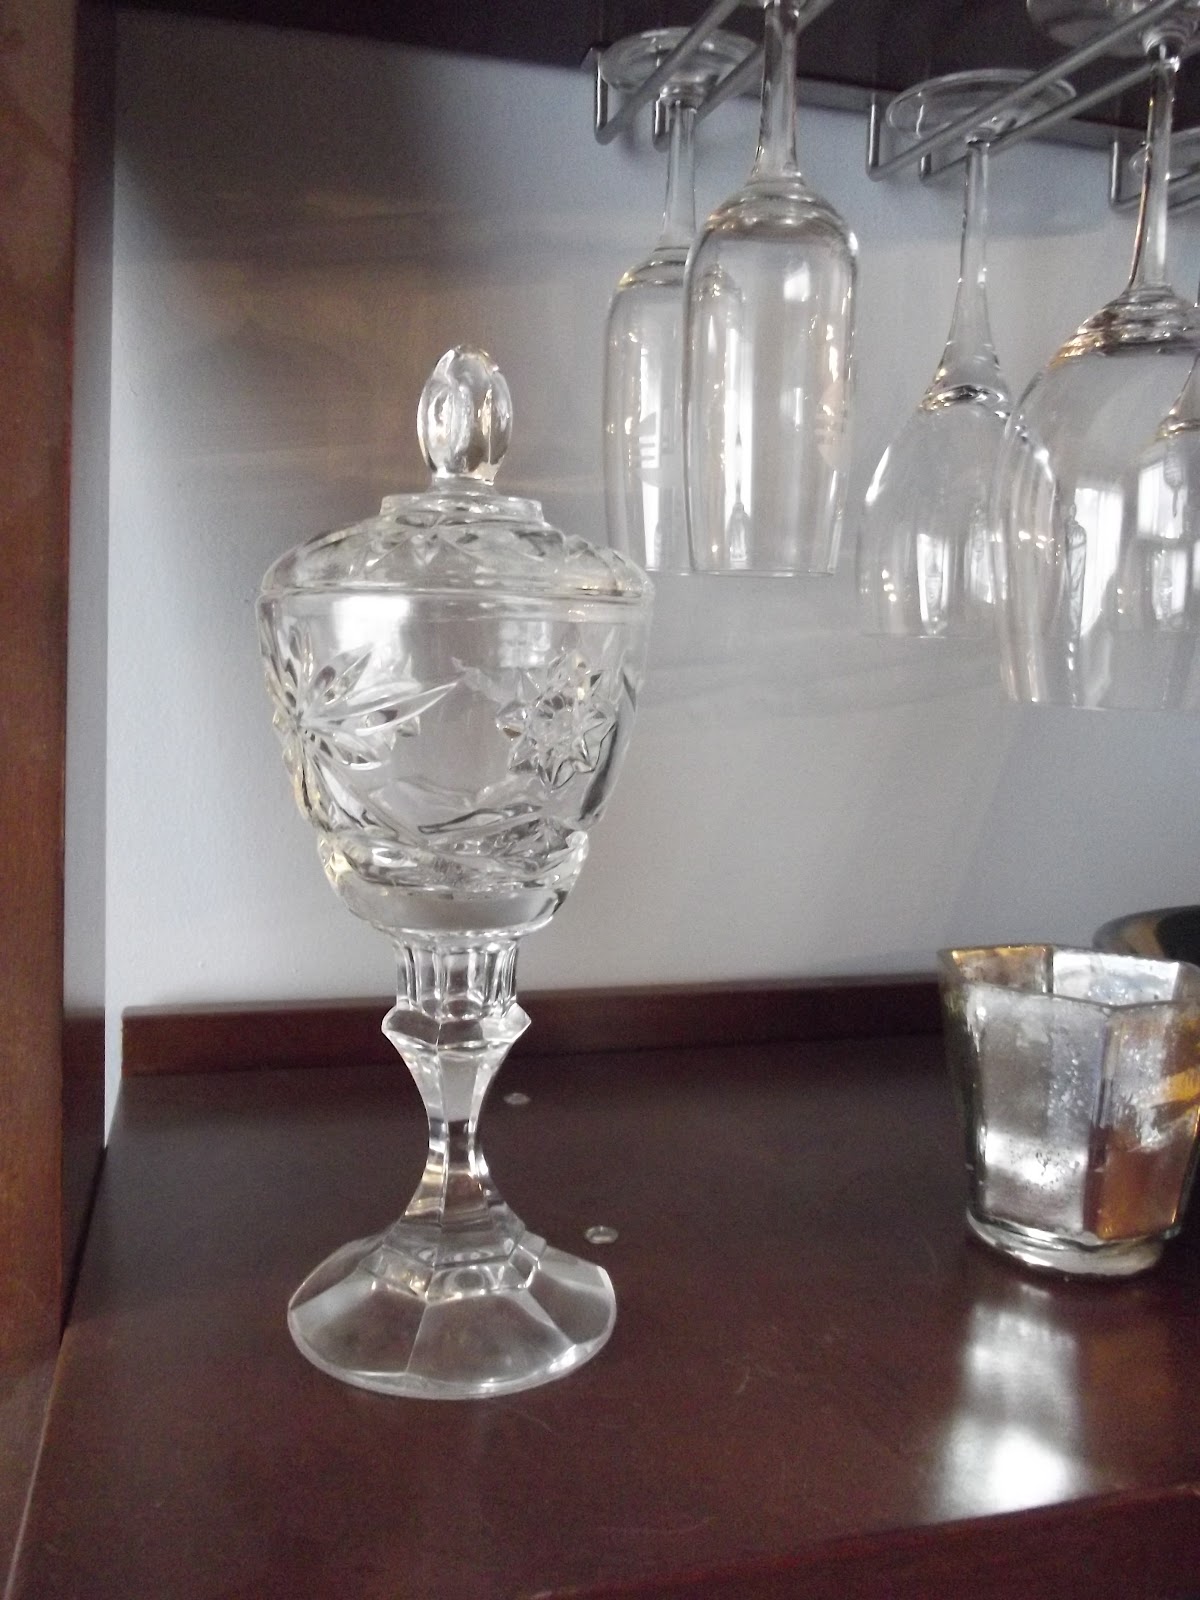
He's a little guy, but I like the cut glass look.  I can almost imagine some Jordan almonds in him or something, although that seems like an odd choice for me.  I have yet to fill him with something since so far I just like how he looks and the bit of sparkle he adds to that shelf.  

What do you think?  I've expanded my gluing interest to other things, but I'll share that next time. 


Tuesday, April 24, 2012

Pop goes the weasel!

I made a piece of art for my husband a while ago, but I wanted to share.  I had seen painted canvases of pop-art styled pets and thought they were super cute.  Like these...


All via Pinterest

But the price tags I saw associated were distressing to a relative cheap-o like me (especially about art which I like to attempt to DIY first).  So I followed the instructions of one Melissa Evans (here is the link to her tutorial) pretty much to the letter and got this.
I've got each of our animals represented from left to right top to bottom, Fatima, Koko, Obi, and Lady.  We have it hanging so we see it on the way into our bedroom.  It makes me smile pretty much every time I see it, and isn't that really the point?


Monday, April 23, 2012

A super simple desktop message board

I was looking for something cute to put on my desk at school that I could use as an erasable to do list/reminder board.  I went to Hobby Lobby and found some pretty cheap frames (they were on sale I believe) that had some visual interest.  I found a couple of scrapbooking papers that weren't too bold or distracting and threw them in there!  


Use a dry erase marker right on the glass of the frame.  Easy peasy!

Any other easy ideas to share?  I love these instant gratification projects.

Wednesday, April 18, 2012

When you make a Vegan Easter lunch...

...you will have to blog about it!  How many of you got that When You Give a Mouse a Cookie reference? A little obtuse, I know. Anyway, I know some people may not think it is really an Easter meal unless there is a ham of some sort, but I can tell you that it can still be very satisfying without!  My mother-in-law is a Vegan, and I am always happy to expand my cooking repertoire and imagination by making things that will please her palate and that of my meat-loving husband.  So here is a breakdown of a simple Easter meal for three (with almost everything being Vegan).

First course was a spinach, arugula, strawberry, and toasted walnut salad with my patented balsamic vinaigrette. The salads made for a very nice looking table on the Fiesta-ware.

I also made some deviled eggs because my husband loves them, but I made them with a twist.  I used the standard mayonnaise (probably will use Vegenaise next time), a smidge of dijon mustard, and Harry and David's Pepper and Onion Relish which is a nice mix of sweet with a little hit of spice.  I use it in all kinds of stuff, and I always keep some on hand.

For the main course, I made a Vegan Shepherd's pie.  The bottom layer was a combination of mushrooms (portabello and crimini) cooked down with Vegan beef bouillon, a little roux with Earth Balance buttery spread, and some fresh thyme and rosemary.  I sautéed some yellow crookneck squash, carrot, and zucchini for the next layer and finished it off with some mashed Yukon gold potatoes with soymilk and prepared horseradish!  It was delish.  Oh, and the drink you see is a homemade Arnold Palmer.  My husband endured squeezing quite a few lemons to make into lemonade, and we mixed it with some brewed PG Tips tea.
My sweet mother-in-law made amazing Vegan carrot cupcakes for us.  Luckily she brought leftovers so we could continue to eat them for a couple days (they didn't last long).
Overall, it was a very happy (fulfilling and filling) Easter afternoon.  I hope you enjoyed yours as well!  Any special Vegan recipes to share?

Tuesday, April 17, 2012

Refinishing chair saga continues...

Sorry I don't have any before pictures of these, but I was too excited to wait I guess.  I found this guy at a thrift store for $8 and just gave it a seat reupholstering.  
But that's not the coolest thing about this chair.  This is...
Yup!  It is a folding chair!  So this little baby actually lives in a closet most of the time.  I know I shouldn't put Baby in a corner, but it's a small house so I don't have much of a choice in the matter.  I can't wait until we actually have enough people over to necessitate busting out this hottie.  Okay, talking about chairs like attractive people is kind of strange.  Moving on...

Found this handsome guy (ack! there I go again) in someone's storage unit.  Don't worry; I had permission to look.  It had this weird (and sooo dirty) yellow material on it, so I stripped that off, aired out the cushion a bit just in case, and primed and painted the sucker white.  A little coercion and a lot of staples later and here he is.  

So that is how far my obsession has gotten me so far.  I am almost out of room, but I am searching for that next chair that is visually interesting and has potential.  Any leads?

Monday, April 16, 2012

Fun with chairs

Seriously, I have kind of gone off the deep end refinishing chairs.  I see chairs in need of love and a place in my home (which often doesn't exist, as it is quite small) everywhere!  It is officially a sickness.  First, it started with this chair...
I spray painted the chair middle white first and then let it cure and covered it with painters tape in order to spray the rest of the chair a dark brown.  I recovered the chair seat in IKEA Majken fabric (which I am in love with) to match my orange-dyed Henriksdal chairs in the dining room. But I still needed another chair for the dining table.  Enter this guy!
Not so pretty.  And I am not a big fan of caning overall.  So I de-caned him (using some heavy duty scissors, time, and arm muscle) and sanded him down for good adhesion with the paint.  I sprayed the back like the one before and created a new bottom using some leftover MDF I had around.  Added some padding and foam via staple gun, covered in a complementary orange-colored fabric and voila!
I've got a couple others that I will share tomorrow.  Any chair recovering in your future?  My husband was nervous about the two-toned back, but I really like it.  Thoughts?

Monday, April 9, 2012

Thrift Store Coup

Okay, "coup" may be a little strong, but I am very excited.  I stopped into one of my favorite thrift stores, My Thrift Store on Blanding Blvd, and lo and behold, a garden stool!  I have been drooling over these for months now but haven't seen many for under $100. Actually, when I searched them, I found this exact copy of mine that retails for over $250!

Picture from Target.com

If you aren't yet hip to the wonders of the garden stool, they have been a fixture in Chinese gardens for over 1000 years.  These little guys are also versatile inside as seen in these pictures.


All above via Pinterest

So when I found one for $5 (cue happy dance), I couldn't resist.
Sorry I forgot to take a before picture.  Seriously, the thing was so ugly, red and white shapes with black sparkly paint thrown on top.  Three thin and even coats of Rustoleum Sun Yellow Gloss spray paint later, and I have this happy stool as a side table and extra seating in my glassroom! Don't tell my husband, but I am in love!


What about you? Any thrift store finds that made you shimmy like a fool in public? Or just grin maniacally?

Wednesday, April 4, 2012

Tray tables up please!

So I found this tray while thrifting for $2.  It looked a little sad, but I needed a tray for my new ottoman so I took the little guy home with me.

I was almost paralyzed with all the possibilities.  White? Pop of color? Modge Podge paper inside? Wallpaper? Finally, I decided on this...

I spray painted the whole thing white (a coat of spray primer first to make sure it stuck).  Then I affixed 3" and 1" inch round craft mirrors (from Joann) using tacky glue.  Then I mixed up a batch of acrylic (Glaze Coat High Gloss Finish from Lowes), poured it and let it set.  So now I have a fun mirrored tray that is perfectly smooth, and I don't have to worry about drinks or anything affecting the wood tray.


Anybody else have fun with trays?  It might be a new addiction for me.  So many options!

Tuesday, April 3, 2012

The Little Lanai that Could

This is a story of a dark, dirty little lanai (that's Florida speak for screened-in concrete slab room).  He had a good foundation and a decent roof, but he just didn't fit in with the rest of the house.  And he was so lonely since the owners had added a patio which was more pleasant to sit on during nice evenings and mornings. Poor little lanai.  He needed a major change.
Luckily, the owners didn't want to give up on the little lanai.  They made a plan to make him useful again!  It would take some time, but the little lanai had learned to be patient.  It had been years since the owners had really spent any time with him! Finally the process began...
He lost his light-stealing black interior...


And got lots of clean new windows!


He lost the dark green trim and white walls...

And got a nice grey wall and white trim!


He lost the dirty concrete floor...

And got a new ceramic tile!


A little furniture...

A little decoration...

And he was whole again and the owners spent a ton of time in there! They even had guests stay on the captain's bed!  The little lanai had transformed into the grand glass room, and he was happy.


And that's the story of our little lanai that could.  Seriously, it might have been worth it just to get this picture of Lady.  She's got her little paws and head on the stair.  Too cute!


  Any stories of rooms that could? Ones that finally realized their potential?

Monday, April 2, 2012

Ottoman Completed!

So here is the completion to the ottoman project started here.

I had a bit of excess fabric I wanted to tack down on the underside, but it would cover my button holes, so I proceeded to do those next.  I made the buttons using one of the button kits from Joann (seriously, I should buy stock in that company).  You find the button kits in the upholstery section (normally near all the decorative fringes and trims).  I also picked up a pack of upholstery needles (the pack with the 12" long needle included, my husband about had a heart attack).  After a bit of trial and error (probably more error, isn't that always the case?), I figured out how to attach my buttons.

First I stuck the longest needle (did I mention 12"?!) through the MDF and out the front backwards! Yes, I pushed it through so I got the eye end facing out the front. I made sure to make my button thread long enough to not disappear when I threaded it through.

I put the button on the thread then threaded the eye of the needle with my button thread (this is a waxed heavy-duty thread they sell by the button-making kit).
Pulled the needle back through and voila!  Button attached!  I used a washer to tie off my thread on the back with as much tension as I wanted to make the button sink into the fluff a bit. You can see the washers in the second picture.  That is also where I just used ye olde staple gun again to tack the extra material to the underside.  I might cover the bottom with another piece of material sometime, but you really don't ever see it so I can procrastinate that.  


And here is the final reveal!  It is living in my glassroom (more on that later) with a mirrored tray on it.  In the future, I would probably round the corners of it a bit, but overall I really like it!

What do you think? Any small not-really construction projects lately that still make you very happy?  Do tell!